Docs-as-code in very basic terms
Most guides to docs-as-code, even the ones for non-devs, assume you have some developer knowledge: maybe you're already using version control, or you've encountered build pipelines before, or you're working alongside developers.
This guide is for the people who read that paragraph and wished it came with a glossary. This is docs-as-code for people who don't know what git is and have never installed VS Code.
This post explains terminology and concepts, to help you get a mental model of what's going on. If you prefer to dive in and pick up concepts as you go, skip straight to the tips in How to learn, and come back to the conceptual info as needed.
Learn by doing
The tools, processes, and patterns discussed in this post make a lot more sense once you start using them. Don't expect the concepts to really click for you until you've got some hands-on experience. And don't be scared to dive in and try things out.
Let me emphasise again how simple I'm trying to keep this
If you're someone who is going to read this guide and go "what about SVN" or "Emacs is better than VS Code", this article is not for you.
Thanks to Craig Wright and Adeline Amar for asking great questions, and providing review and feedback.
What is docs-as-code?
Docs-as-code, also called docs like code, is the practice of treating documentation development the same way as code development. This includes using the same tooling and processes as your development and DevOps teams.
The advantages are:
- The tooling and processes are familiar to developers, so it makes it easy for developers to contribute to your docs.
- If you want community contributions, it unlocks the same processes as open source code projects use.
- It provides a really nice way to collaborate: although they have a learning curve and setup effort, docs-as-code tools and processes are a great way to support multiple people working on the same project, reviewing each other, and getting work live fast.
- If your company already has developers and a product that gets deployed in some way, then it probably already has a lot of the tooling: you won't need to get approval for much new software.
- Docs-as-code tools tend to be cheap, at least when looking at the initial price. A text editor, static site generator and theme usually costs nothing to acquire, whereas MadCap Flare is currently $234 a month for its cheapest option.
The disadvantages:
- You need some web dev skills to work with it. You don't need to be a developer, but you're going to have a bad time if you're not familiar with using git at the very least. This can exclude some contributors.
- There are hidden costs in maintenance and customisation. Although having worked with other toolsets, they also have a learning curve and setup and maintenance effort, so I don't see this as a huge difference.
- Eventually someone will have the bright idea that your company should create a custom theme (or even entirely custom tooling). This is a very bad idea, but people keep doing it, and you'll end up living with the pain.
Do docs-as-code tools have the same functionality as other docs tools?
With "other docs tools," I'm thinking of heavyweight authoring tools like MadCap Flare, or knowledge base tools like KnowledgeOwl.
The answer is yes, but with caveats. You need to pick the right static site generator and theme, and you may need to bring together several tools, rather than getting everything in one package.
A static site generator designed for docs, with a docs-focused theme, should be feature-rich. If you try out Material for MkDocs, which I use as my example in this post, you'll see it has a lot of features, including:
- Content reuse
- Glossary
- A lot of ways to customise your navigation to suit your information architecture
- Configurable search
- Support for diagrams, admonitions, code annotation and highlighting . . .
Popular static site generators often have plugins or extensions that add even more functionality. And some of the tools you may be used to such as link checkers or other quality tools are available: sometimes built into the static site generator, but if not, you can add them as standalone tools that run as part of your build and deployment process.
Tooling and terminology
A quick reference to tools and terminology you'll encounter when working with docs-as-code.
Docs-as-code setups tend to have a lot of components.
| Component | Description | Examples |
|---|---|---|
| Text editor | This is where you do your writing. You install it on your computer. | VS Code |
| Markdown | A lightweight markup language. You write plain text, with symbols to indicate elements. For example, to create headings, you use # My heading (for top level), ## My subheading for the next level, and so on. |
There are different flavours of Markdown, and lots of extensions to the syntax. This cheatsheet covers the basics. |
| git | Version control software. You install this on your computer. It tracks file changes and facilitates collaboration, allowing more than one person to work on the same file at once. It's a key developer tool (one of my mildly spicy takes is that pretty much everyone in tech should learn git) but it's baffling at first: there's a lot of new terminology, a new way of thinking about files and versions, and potential complications if you get conflicts (two people change exactly the same thing). It's probably the scariest part of docs-as-code (until you meet the person who wants to build their own tools). | git |
| Software platform to store and manage work with git | A website where you store files and collaborate on them. Works with git. | GitHub, GitLab |
| Static site generator | A tool that takes Markdown and other assets (such as images and templates) and turns them into a website. You'll install this on your computer so you can configure it and preview your work. It will also run remotely as part of your build process. | MkDocs |
| Static site generator dependencies | Most static site generators need a code environment to work. For example, MkDocs is built with Python, and you need Python installed for MkDocs to work. | |
| Theme | A collection of templates and styles that tells the static site generator how the output should look. Themes often control a lot of the things we think of as docs features. | Material for MkDocs |
| Linter | A tool to check your docs for spelling, style conventions, clarity, and more. Use it both in your text editor and on GitHub. | Vale |
There are also terms for the processes involved.
| Term | Description |
|---|---|
| Build process | The steps to turn your work from Markdown into a website. This includes running the static site generator's build process, but can also include other steps. For example, you might run automated test. |
| Deployment process | Getting your work live. In practice, the build process and deployment process often run as one multi-step process, with build automatically followed by deployment. |
| CI/CD | Continuous integration / continuous deployment. The practice of constantly adding small changes to a code base, and deploying them instantly. The process is usually automated. |
There are a lot of git and GitHub terms. GitHub provide an extensive glossary. Don't worry about this too much right now: you'll learn the key terms when you start learning git.
Ok but how does it all come together?
So we've got a long list of tools and a bunch of processes, but what does it actually look like when writing docs?
The simple version
- Write some docs in a text editor.
- Using git, send your new docs to GitHub.
- Follow some steps on GitHub to finish adding your new docs to the site.
- A process runs which takes your changes, builds everything into a website (using the static site generator), and deploys it to a server.

The longer version, with terminology
Don't worry if this doesn't all make sense right now. It'll make a lot more sense when you learn git (see How to learn below).
- Using git, make a copy of the docs site from GitHub on your computer using the
git clonecommand. - Using git, make a second local copy from the first using the
git checkoutcommand. This is called branching. See the git patterns section below for an explanation of why we do this. - In your text editor, write some docs. Usually you write in Markdown (yes, other options are available points to the note at the top)
- Using a static site generator, create a preview build on your computer to check your work.
- Using git, send those changes to GitHub. This is called pushing. You push your branch, and this creates a copy of your branch on GitHub.
-
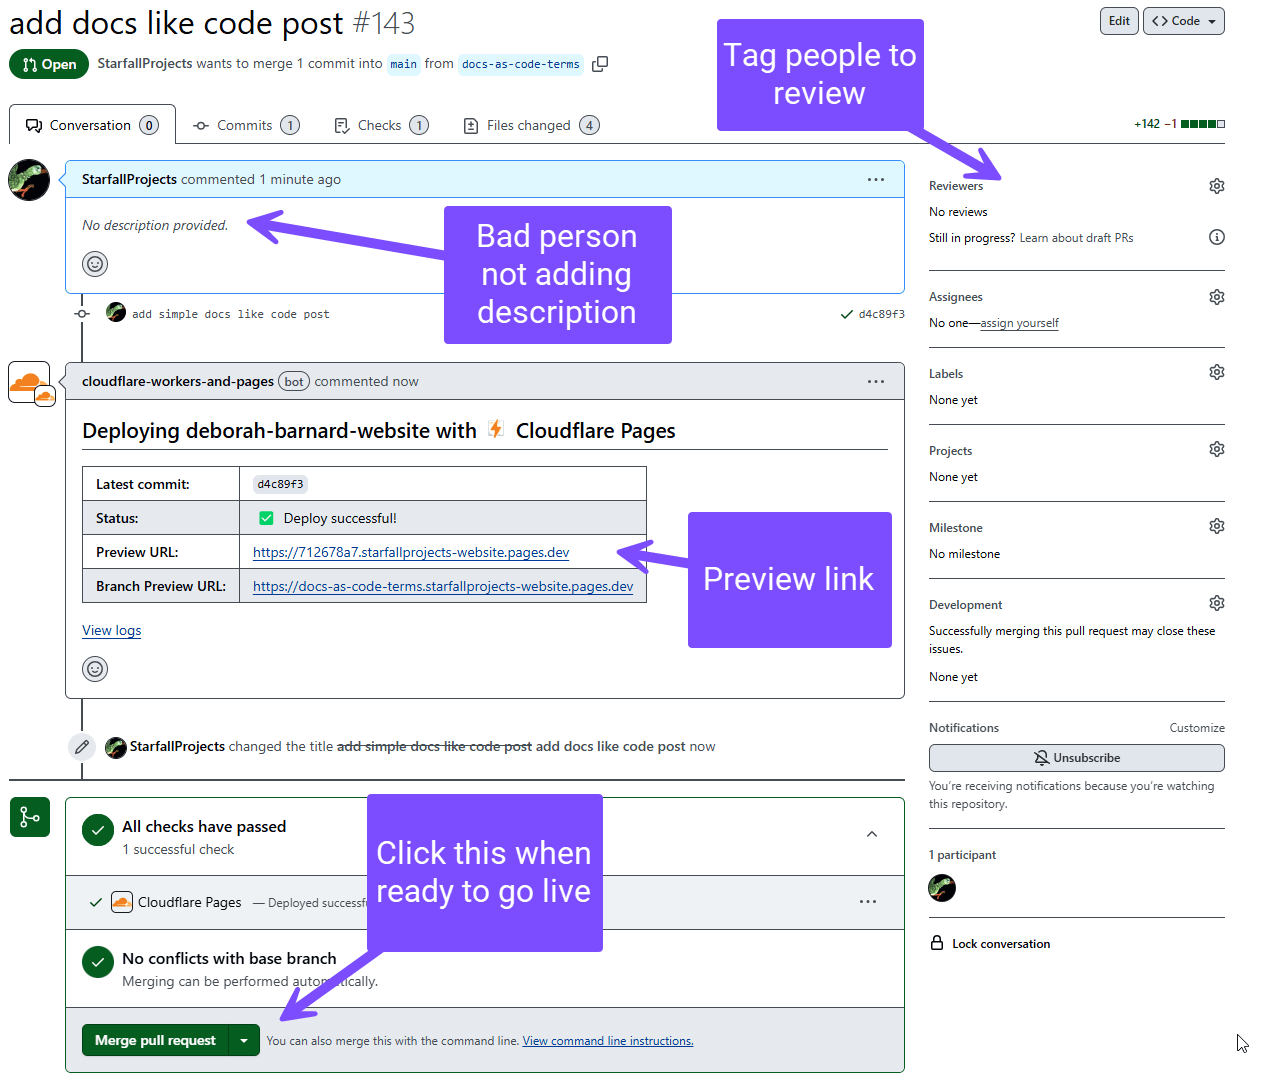
On GitHub, ask to add your changes to the docs site. This is opening a pull request (PR).
At this point in many docs-as-code setups, a build and deployment process runs to create a preview build. This doesn't make your docs live, it just creates a preview version to help you check your work. Usually the process adds the link to the preview to your pull request.
Here's an example of what a pull request looks like:
-
On GitHub, your work (your pull request) can be reviewed and commented on. You may make changes.
- On GitHub, your changes are added to the docs. This is called merging the PR.
- Your automated build and deployment processes kick in to turn your Markdown files and other assets into a website, and set them live.
git patterns
git sounds weird at first. You have a copy of the site on your machine, another on GitHub, then you make more copies on your machine, and more on GitHub. However, the pattern of branching (copying) and merging (combining copies) has several advantages:
- Keeps the main branch clean: your main branch and the main branch on GitHub should always be the same. This is the live version of the docs site, so you don't want work in progress to end up on this branch.
- Allows you to work on several things at once without them getting mixed up. For example, you create
branch-1to write some docs forfeature-1. Half way through, you learn thatfeature-2is actually launching tomorrow and you need to quickly write some docs for that. You create a new branch,branch-2, do your work there, and can set those changes live, without any of your work in progress onfeature-1getting mixed in. - Your branches on your machine map to branches on GitHub, which can then be merged into the main branch on GitHub. This means you can have several pieces of work in review and being edited at once.
- You can pick up changes and avoid or resolve conflicts: for example, someone else changes a document you're also working on, and merges their changes to main. You can update your copy of the main branch, then copy over their changes into your feature branch, and resolve any mess (there are tools to make this easier). This is one of the complex aspects of git, but once you get used to it, it allows dozens of people to make hundreds of changes to a single project in a week, relatively smoothly.
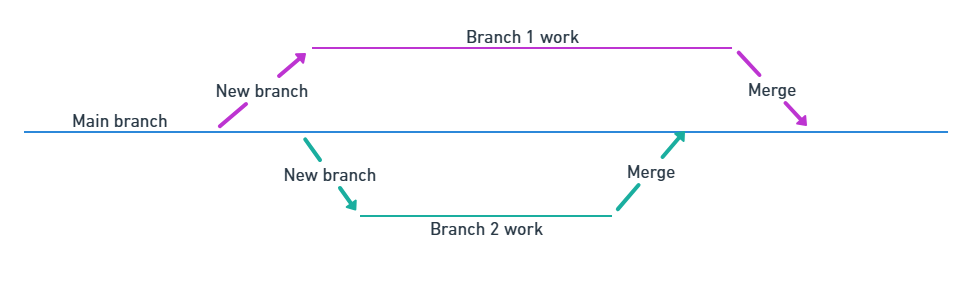
(yes, I know there are other patterns for working with git points to the note at the start)
I'm only scratching the surface of git here. When you learn git and GitHub, you'll learn just how detailed the version history is, how to roll back changes, and will get a far clearer understanding of handling merging.
Static site generators
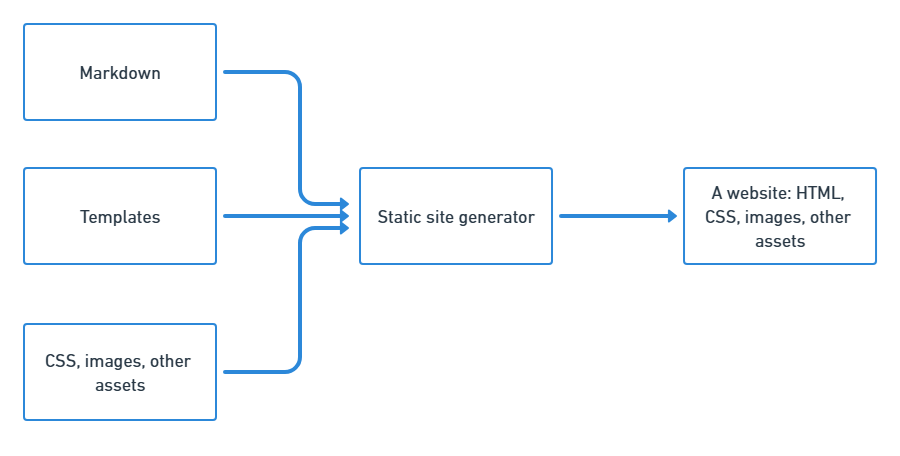
I mentioned above that static site generators are a tool that takes Markdown and other assets (such as images and templates) and turns them into a website. It can help to have a mental model of what that means.
You feed in:
- Content (in Markdown)
- Assets such as CSS (for styling) and images.
- Templates: these tell the static site generator how to process the Markdown. For example, they define the layout.
You get out a complete website. The Markdown and templates have become HTML.
You don't need to understand all the details of how a static site generator works, but here are a couple of conventions you'll encounter:
- Dependencies: before you can run a static site generator, you need to install its dependencies. For example, if the static site generator is built in Python, this means installing Python.
- Configuration: you can control a lot of the options for your site using a configuration file. In MkDocs, this is called
mkdocs.yml. Other static site generators will call their configs different things, but they'll usually be eitherNAME.ymlorNAME.json.
If you can install the dependencies (and the static site generator itself), and use the configuration file, this is enough to get started.
Build and deployment processes
So you've written your content, previewed it on your own computer, and got it onto GitHub. What actually happens to create previews or set it live?
Basically, the same thing as with your local preview: the static site generator runs and builds the site. This happens on a server . . . somewhere. There's a whole world of tools specifically for managing CI/CD processes. A few options:
- If you choose a provider like Cloudflare Pages or Netlify, they handle all of this for you. You connect your GitHub account to them with a few clicks (I have guides for this if you're using Material for MkDocs: Cloudflare Pages, Netlify), set up a few configuration options, and they do the rest: automatic preview builds every time you make a pull request, automatically build and set live every time you merge to main on GitHub.
- You can also host on GitHub Pages, and use GitHub Actions to run the build and deployment process. Material for MkDocs provides a guide to Publishing your site which includes this option.
- If your company is a software company, it probably has existing CI/CD tools. Ask your DevOps or SysAdmin teams what they use to build and deploy code, and see if they can get you set up using the same.
How to learn
Don't panic
If you follow all these steps, you'll learn a lot. Using git and successfully deploying a static site means learning the basics of development and DevOps processes. Don't let that put you off, just be gentle with yourself and expect it to take some time for everything to make sense (or even work). Hopefully, you'll end up with a lot more technical confidence, as well as a docs skill set.
- Start with git. This is the scary bit (using the command line, lots of new terms and concepts), and also the key skill. Full disclosure, I haven't used either of these learning resources, but I've heard both recommended:
- Learn git in a Month of Lunches (book)
- Git and GitHub for Writers (Udemy course)
- Try out a static site generator and theme. Although these run remotely as part of the build process, you can also install them on your computer. It's a good idea to do this, so you can preview your work as you go. And it's essential if you need to configure the docs site (for example, changing which features are enabled, or customising the look and feel). Follow the steps in Material for MkDocs | Getting started. You'll need Python installed as well (ok, this step is also a bit scary).
- Read an article about CI/CD, such as GitLab | What is CI/CD?.
- Learn how to deploy your Material for MkDocs site with Cloudflare Pages. I have a guide for this.
More resources
Book by Anne Gentle: Docs Like Code.
Article I wrote for KnowledgeOwl's blog: Docs as Code: An introduction for beginners
Write the Docs resource collection: Software documentation guide | Docs as Code
Wrap up
This has been a quick(ish) basic introduction to docs-as-code for people totally new to the topic. You'll need to read (and practice), and will probably need help. The Write the Docs community is a good place to ask questions.
If you're a business that needs help with your docs-as-code setup, contact me!